Wednesday, December 5, 2012

Circle Quilt


Here is the Circle quilt I did for our "Bonnie & Camille" challenge at the LV Modern Quilt Guild. I don't think of myself as a Modern quilter but I am trying to design more modern. With my favorite fabrics I was so excited to come up with something fun.
I seen a Circle quilt on a modern blog and decided I wanted to make one. I thought it would be something a little different.
I started with cutting out my squares which I did on the Go Cutter. I think it would be easier if you used Charm packs. I had a lot of these fabrics so I cut them myself.
I ended up sewing a square 54X54 and then cut it down.
I couldn't find on the web anywhere where it tells you how to cut a quilt into a circle. So I quess now it will be on here.
I used a wedge ruler to help me. I folded my quilt into fourths. and the put the wedge ruler on the fabric and turned it as I cut a quarter circle.
I asked my husband how to make a square a circle and he said to use a string and tie a piece of chalk on one end and mark the quilt.  I did find that info on the web. I read on the web that it is hard to keep your hand steady and mark your quilt at the same time.
So, here is the ruler I used


Great Ruler!
 
Well once it was cut I cut the back and the batting the same way. Then I had to quilt it. I layered it and made a sandwich. The back, batting, & the top. I used a temporary spray adhesive on each layer to help it stay together. Then I used quilting safety pins to pin it together. I decided to Big Stitch the center. Here is a picture of the back.
I think I need to get better at Photography
I used a red pearl cotton for the big stitch quilting, then I went back to the ruler and used it to mark my lines and then stitched them on the Bernina 830.
I cut my binding strips on the bias and then sewed them together and sewed them on the front and hand bound it on the back.
I love binding it is so relaxing!
Well needless to say I didn't win the challenge. Didn't think I would. You should see how talented the ladies are that are in the Guild. Camille Roskelly came and judged the quilts for us. She is so fun! You can go to the http://lasvegasmqg.blogspot.com/
I wish I would post on here more often. I do have some cute knitting projects I need to put on here. Until next time...


Friday, November 9, 2012

Big Stitch Baby Quilt

So it has been a while again since I have posted anything. I finally decided I better get back to posting some of the projects I have made. I made this for my great niece, Lillian. I used one of my favorite fabrics "Ruby". I actually made this out of a layer cake and a charm pack I had left from other projects. I decided to quilt it by hand, using the Big Stitch method. That is done with Pearl Cotton thread.
Here is a closer look at the Big Stitches.
I just can't get enough of this fabric!
I have managed in the last couple of months to finally get a King size quilt to the Longarmer. It was a quilt I have worked on for several years. And when I say "several years"...
Enough said! I can't wait until I get it back so I can put it on my bed. My husband has asked about it for along time. It is from the pattern "Meet Me In Paris".
I also have been knitting different items for my 1st Granddaughter! So excited about being a Grandma. I do know one thing she will be so spoiled.
More to come and hopefully sooner than later!

Saturday, August 25, 2012

Retreat Gifts

Gifts from my Secret Sister, Zany Quilter
On our quilting retreat we each had a Secret Sister that we all had fun making gifts for. Well, I was so spoiled by my Sister, Vic (Zany Quilter). We each had the opportunity of filling out a list of different things we enjoyed. Well my new love of fabric is Millie's Closet by Lori Holt (Bee in my Bonnet). Well it goes great with my other favorite "Ruby", from Camille Roskelly.
Vic is so talented and creative! She added linen and made me these cute baskets(they have hand big stitching on them also), pin cushion, 2 mug rugs, the cutiest thread catcher, a nice large zipper bag with binder clips, a charm pack of Millie's Closet, and the cutiest scrabble "SEWQUILTY! I also got my favorite Reese's Mini's and a bag of M&M's. I almost forgot the cute sissor fob's she made. I ended up with two of them because she gave one of those to everyone. 
Thank you Vic for making everyday a nice surprise! I love it all! Here are some more up close pictures.
I can't wait until the next retreat!

Thursday, August 23, 2012

Latest Projects

It has been a while since I have posted anything on here. It seems like I have good intentions but I don't get around to getting on here. So I am really behind posting projects. So I thought I would post some.
1st is my journal cover I made for Jessica. (Her blog is stitched in thyme) The LVMQG had a journal cover exchange. We picked a fat quarter for the another person to make us one. We used the fat quarter for inspiration. Here is the pictures I took before I gave it to Jessica.

The patterns information is on the the LVMQG blog. (Las Vegas Modern Quilt Guild)

August 12 thru August 15th, 2012 was the quilting retreat for the LVMQG. It was held in a remote cabin near Seligman, Arizona. We had so much fun! We were given a secret sister to make something for the three days we were there. I had Brie, who is so talented. She makes the most darling handmade dolls. And then you should see her quilts. Here are some of the things I made her.
Brie works at the Cosmopolitan Hotel. This was made for her to have at home while she is baking. She makes the best pies.  I also knitted her a cozy for a coffee mug. It looks like a sweater made for a mug. I will have to get a picture of it and put it on here. Brie loved it. So I gave her the pattern since she just learned to knit. I am also going to take a picture of my quilting room with all the new wonderful additions I received from my sister. Wait until you see. My Sister was Vic, Who's blog is Zany quilter. I was so spoiled! She made me feel so special everyday. I should of know it was her by the unbelievable craftsmanship in each gift. Everyone in the guild is so talented! And they all are so much fun to be around. 4 days and 3 nights with 12 women and we all got along and had a blast! Can't wait to do it again!
Here are some other projects I managed to finish over the last few months.
Joy and Happiness
For my Aunt Doe!
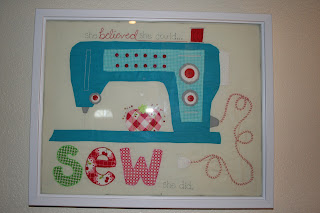
"She believed she could Sew she did"
My first hand applique!
I will go take those pictures now of all of my wonderful gifts I got so I can post them tomorrow. Wait until you see!


Saturday, May 26, 2012

DUP Pillow

I belong to the Daughters of the Utah Pioneers and we are getting a new Captain this next year. So I volunteered to make something for our Captain Juana. She loves fancy things so I decided to make it out of Satin and Lace. I wish I would of had more time to make a quilt for her. I guess I have two years to get prepared for when our next Captain leaves to make a quilt. I decided to use the Bernina 830 to embroider something. There are not very many Pioneer designs out there.  I was only able to find one Pioneer design that I thought would work and actually it worked perfect! (Hence, the Sun in the background) Our Camp is called Desert Sunrise so it work perfect. She was delighted with it, which made me happy! She is one of my childhood mentors and means so much to me. That is one reason I attend DUP.
Getting  ready to sew all weekend into Memorial Day! Be prepared to see some finished projects!

Sunday, May 13, 2012

Zoom Zoom Quilt

Well I did get this finished in time for the baby shower! Thank goodness! Who ever thought Minky was easy to work with, was crazy!
This is a pieced, appliqued all Minky quilt. Custom Creations came up with the inspiration for this awesome "Zoom Zoom" quilt made with Shannon Fabrics. It is such a cute Minky line of fabric. Amy picked the kit out and bought it  and I sewed it! Andrea did help the last night with the binding. Of course, we got it at Quiltique!  I think it all sewed pretty well together until making the binding. Minky moves so much when you sew that it was hard to get to be straight. There are some great tips for Sewing with Minky on my Pinterest page.  I repinned the tips under my "Sewing" board. I used a yellow minky for the back that I had in my stash.
Also, I am so glad for 505 adhesive spray! There is no way you could of done this quilt without it! I think I used a whole can!
As for Kolton's shower, I think he is going to be one spoiled baby! Which he should be! I think there were way over fifty gifts for him and Ashley.
On to the next project!

Wednesday, May 2, 2012

Baby "Kolton" Name Banner


This is for my niece Ashley. She is expecting a baby boy June 29, 2012. His name is going to be Kolton Derrell Watson. We have all been busy making things for him. Ashley's baby shower is this weekend.
Kolton's room is done in JC Penneys Jungle Bedding. I found this fabric at Hobby Lobby. It is a stretchy fabric like oil cloth, it is for baby diapers.
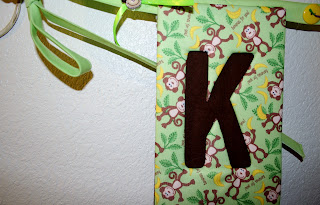
I thought the Monkey fabric and the brown, green and yellow fabric matched the bedding perfect. I bought the letters from Quiltique. They are Basic Grey's Chip Board Letters. They worked perfect to make a banner.  I put monkey button on the ends and green, yellow, and brown buttons in between the letters. I will have to say one thing I am tired of using the glue gun. Haven't done that for a while. Hopefully she likes it. I think it will look great hanging on the crib or on the wall some where.
Here is an up close picture of the "K" so you can see how cute the monkey fabric is.
Well, I guess I better get busy finishing a Minkie quilt that I am making for Kolton for my daughter Amy to give as a gift. Hopefully I will get it posted by Friday, since the shower is Saturday!

Friday, April 20, 2012

Other Recent Projects

Since I am trying to put something on here at least once a week and I got way behind, I  thought I would put some of the projects Andrea & I  have been working on. Here is our new sewing machine cover Andrea made for our Bernina 830.
I am going to have to get busy and finish some more projects so I can have something to post about.
Cover for the 830

Andrea made this out of Camille Roskelley's "Ruby" line. I think we like this line! The pattern is from a website www.createdbycj.com.

Fabric Dachsund

I found this pattern on our Salt Lake Trip at Pine Needles Quilt Shop. Pine Needles is a cute quilt shop in Gardner Village. They have these all over their store out of different fabric. I made this one to look like a girl for our "Whiskey" dog who hangs out in our Sewing room while we sew. I love Dachsund! Here is a picture of our cute "Whiskey".
Well I guess I better finish up here since I have to get ready for tomorrow's Sew Street Market that Quiltique is having in Henderson. They have this once a year so you can clean out your sewing room of unfinished products and fabric and what ever else you want to sell. We will be selling fabric, yarn, and some patterns. Hopefully we will make some money so we will be able to buy some new fabric. Ha!


Thursday, April 19, 2012

Baby Infant Seat Cover

One of my recent projects included making a baby infant seat cover for my friend who just had a beautiful Baby Girl.
I got the idea off of Pinterest. The link is on my Pinterest page. Follow me on Pinterest.

Here is a picture of my final product. I added the flowers that I embroidered with a Jenny Haskins pattern digitized for the Bernina. And of course, I used the 830. The flowers are all done in the hoop and then you use a wood burning tool to cut them out of the hoop. Steam them and they curl up like a real flower!

The inside is the brown fabric used on the straps. I guess if I make anymore I will need to get a baby infant seat. Ha!

Wednesday, April 18, 2012

Las Vegas Modern Quilt Guild Color Challenge

In the Las Vegas Modern Quilt Guild, which I belong to, had us sew a project that was inspired by a product. Victoria Secret's Pink Cologne was my inspiration. I had been really wanting to make a new bag. The pattern I used was "Chubby Charmer" by Peggy Sturges.
One of the last steps is making boxed corners. When I cut the corners I used the fabric I cut off for my flower petals on the front of my bag!
Here is a better picture of the completed bag.
On to the next project!

Tuesday, April 17, 2012

Fabric Bowl

I can't believe it took me so long to get something posted on here. Anyway, here is a fabric bowl I made for my daughter Amy, In-Laws. They live in Maryland and have a sunny kitchen that I thought this would be great for.
I thought I would show how I made it.
I started with:
2  yards of fabric. I bought 2 different fabrics out of the same line
1 spool of Wooly Nylon Serger Thread ( I use Superior Thread or Gutermann has a good one too)
2 Spools of Serger Thread
1 Spool of Regular Thread for Sewing Machine
1 bundle of Clothesline Rope
I cut 1 inch strips selvage to selvage. You need a lot of strips to make a bowl. I cut all 2 1/2 yards of fabric into strips.
Then I got my Serger out and Serged  the strips to together. I used only 3 threads to make the (Rolled Hem Stitch) on a blue one and then a yellow one. I attached them together and over lapped them and serged away. (As shown below)
After you have all the strips sewn together you roll them up and put a rubber band around the bundle so it is easier to wrap the rope.
To cover the rope in the beginning you start at the top and put a piece of fabric over the top of the rope and then start winding with the serged part of the fabric on the top and on the left of the rope. Also, I use a large clip to hold my fabric in place as I go. ( It takes a long time to get the rope wrapped)
Once you have the rope all wrapped, it is time to start sewing it together. Use a zigzag stitch to sew it together. I used yellow thread to blend in. You take the covered rope and start making a circle. This is the easy part.
Zigzag around the edges where the rope connects one to another. Continue until you have made the size of bottom of the bowl and then turn on its side and stack the rope on top of each other to start the sides and continue around until you reach the size you want. This is a little harder to maneuver. This photo is of a coaster I made with left over strips.
I have found that the Bernina 830 sews this easier than any other machine I have tried. I also used a special foot that helped with the thickness of the rope. Bernina Foot 59C. It is a double cording foot. Don't let this discourage you. It has been done on other machines.
At the end I decided it needed handles. This is when I decided to braid two handles and then I sewed them on, across from each other.
The thing that took the longest for this project is the actual wrapping of the cord.
I was excited about the end result. I also bought a glass bowl to keep inside, so the fabric doesn't get as dirty. Especially it is used for fruit or whatever will be kept in it.
I sent it off in the mail and got an email the other day that they loved it and the comment "I don't have anything like it". So I accomplished my goal!


Monday, April 2, 2012

St. Patty's Day Wreath

I can't believe how time flies? I have several projects I need to get on here so for the next couple of days I'm going to be busy. For St. Patty's Day I made a wreath. I am going to try to do a tutorial on how it was done. Well here it goes:
Finish Wreath
First I used 2 1/2 yards of a silky polyester with shamrocks on it that I got at Joanne Fabrics. I marked every inch, selvage to selvage and then tore the strips to make a fraide edge. Then I cut the strips into 6 inch pieces. I tied them to a metal wreath that I bought at Joanne's. (They have smaller ones, in case you don't want to spend hours tying the ties.
This is the fabric I used

This is what it looks like with all the ties tied.
Then I had my daughter Andrea, design in the Bernina software a shamrock. We sewed it in the hoop. We used green Heather Bailey felt.  And then slit a hole in the back and stuffed it lightly. Then I hand sewed it shut. (You could make the shamrock by hand, but we like using our 830 Bernina!)
Then I cut 2 inch strips with the pinking shears to make the bow. I sewed it together like I would strips for border/binding a quilt.
I cut a 1 x 8 inch strip with the pinking shears and then I sewed it to the shamrock.  I tied this to the bottom of the wired wreath.

Then I took the long ribbon and wrapped it through the wired wreath and tied it to make a bow.
Here again, is the finish product!

Sunday, March 4, 2012

This is the outfit I made my niece for a fashion show at Quiltique. They had everyone pick a pattern and the fabric to make an outfit for there first Quiltique "Quties" Fashion Show. Andrea & I picked the pattern called "Playdate Outfit" By Carine Gardner. The fabric we picked out was "Kaoki".  Grandma added the purse and the cute sandles. I made the headband using the same fabric flower which was on the top.
I only had one fitting with my niece because she lives in another state but the pattern fit true to size.
Here is Ava at the fashion show.
We had to do a little encouraging to get her to participate but with the help of my daughter, Amy she walked down the red carpet and showed her stuff. She is a handful but so much fun! Thank goodness Daddy showed up also! Whew! What a day!

Friday, February 17, 2012


I want to show the great bargain I got when buying an outfit for a new little one. I found this dress at Sams Club on clearance and the shoes at the 99cent store. So I decided to add some socks and a headband. I wanted to make some embroidered nylon flowers on the BERNINA 830 but was out of Crinkle Magic. So instead I
found on    Pinterest Logo that I had pinned these cute crochet flowers. So I went to my yarn stash and found  some fleece yarn and decided to make the flowers out of it.

Now the outfit is finally ready to give to the newest little one at my church.

You can follow me on Pinterest Logo under Cindy Goddard.

Wednesday, February 15, 2012

Christmas Stockings

I decided we needed new stockings so I started these before Christmas but didn't give myself enough time to get them done so I finished them in January. Well at least they are done for next Christmas.
They are made from Camille Roskelly's Merry pattern. Fabric was out of her Moda fabric line Ruby.
I think I am done making pinwheels for awhile.

Inspired Blog

I decided since everyone else had a blog, it was time for me to start one.
Since recently I found out that I have a lot of Irish ancestors that I would come up with a title for my blog with some Irish Inspiration or I mean Inspiora'id.
This will be a place to keep track and show my quilting, sewing, & knitting inspirations.
I am so excited to get busy so I can post some of the fun projects that my daughter, Andrea & I have fun creating!