Friday, April 20, 2012

Other Recent Projects

Since I am trying to put something on here at least once a week and I got way behind, I  thought I would put some of the projects Andrea & I  have been working on. Here is our new sewing machine cover Andrea made for our Bernina 830.
I am going to have to get busy and finish some more projects so I can have something to post about.
Cover for the 830

Andrea made this out of Camille Roskelley's "Ruby" line. I think we like this line! The pattern is from a website www.createdbycj.com.

Fabric Dachsund

I found this pattern on our Salt Lake Trip at Pine Needles Quilt Shop. Pine Needles is a cute quilt shop in Gardner Village. They have these all over their store out of different fabric. I made this one to look like a girl for our "Whiskey" dog who hangs out in our Sewing room while we sew. I love Dachsund! Here is a picture of our cute "Whiskey".
Well I guess I better finish up here since I have to get ready for tomorrow's Sew Street Market that Quiltique is having in Henderson. They have this once a year so you can clean out your sewing room of unfinished products and fabric and what ever else you want to sell. We will be selling fabric, yarn, and some patterns. Hopefully we will make some money so we will be able to buy some new fabric. Ha!


Thursday, April 19, 2012

Baby Infant Seat Cover

One of my recent projects included making a baby infant seat cover for my friend who just had a beautiful Baby Girl.
I got the idea off of Pinterest. The link is on my Pinterest page. Follow me on Pinterest.

Here is a picture of my final product. I added the flowers that I embroidered with a Jenny Haskins pattern digitized for the Bernina. And of course, I used the 830. The flowers are all done in the hoop and then you use a wood burning tool to cut them out of the hoop. Steam them and they curl up like a real flower!

The inside is the brown fabric used on the straps. I guess if I make anymore I will need to get a baby infant seat. Ha!

Wednesday, April 18, 2012

Las Vegas Modern Quilt Guild Color Challenge

In the Las Vegas Modern Quilt Guild, which I belong to, had us sew a project that was inspired by a product. Victoria Secret's Pink Cologne was my inspiration. I had been really wanting to make a new bag. The pattern I used was "Chubby Charmer" by Peggy Sturges.
One of the last steps is making boxed corners. When I cut the corners I used the fabric I cut off for my flower petals on the front of my bag!
Here is a better picture of the completed bag.
On to the next project!

Tuesday, April 17, 2012

Fabric Bowl

I can't believe it took me so long to get something posted on here. Anyway, here is a fabric bowl I made for my daughter Amy, In-Laws. They live in Maryland and have a sunny kitchen that I thought this would be great for.
I thought I would show how I made it.
I started with:
2  yards of fabric. I bought 2 different fabrics out of the same line
1 spool of Wooly Nylon Serger Thread ( I use Superior Thread or Gutermann has a good one too)
2 Spools of Serger Thread
1 Spool of Regular Thread for Sewing Machine
1 bundle of Clothesline Rope
I cut 1 inch strips selvage to selvage. You need a lot of strips to make a bowl. I cut all 2 1/2 yards of fabric into strips.
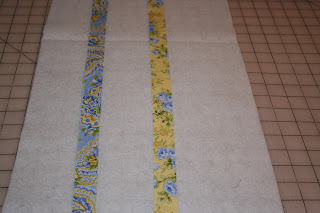
Then I got my Serger out and Serged  the strips to together. I used only 3 threads to make the (Rolled Hem Stitch) on a blue one and then a yellow one. I attached them together and over lapped them and serged away. (As shown below)
After you have all the strips sewn together you roll them up and put a rubber band around the bundle so it is easier to wrap the rope.
To cover the rope in the beginning you start at the top and put a piece of fabric over the top of the rope and then start winding with the serged part of the fabric on the top and on the left of the rope. Also, I use a large clip to hold my fabric in place as I go. ( It takes a long time to get the rope wrapped)
Once you have the rope all wrapped, it is time to start sewing it together. Use a zigzag stitch to sew it together. I used yellow thread to blend in. You take the covered rope and start making a circle. This is the easy part.
Zigzag around the edges where the rope connects one to another. Continue until you have made the size of bottom of the bowl and then turn on its side and stack the rope on top of each other to start the sides and continue around until you reach the size you want. This is a little harder to maneuver. This photo is of a coaster I made with left over strips.
I have found that the Bernina 830 sews this easier than any other machine I have tried. I also used a special foot that helped with the thickness of the rope. Bernina Foot 59C. It is a double cording foot. Don't let this discourage you. It has been done on other machines.
At the end I decided it needed handles. This is when I decided to braid two handles and then I sewed them on, across from each other.
The thing that took the longest for this project is the actual wrapping of the cord.
I was excited about the end result. I also bought a glass bowl to keep inside, so the fabric doesn't get as dirty. Especially it is used for fruit or whatever will be kept in it.
I sent it off in the mail and got an email the other day that they loved it and the comment "I don't have anything like it". So I accomplished my goal!


Monday, April 2, 2012

St. Patty's Day Wreath

I can't believe how time flies? I have several projects I need to get on here so for the next couple of days I'm going to be busy. For St. Patty's Day I made a wreath. I am going to try to do a tutorial on how it was done. Well here it goes:
Finish Wreath
First I used 2 1/2 yards of a silky polyester with shamrocks on it that I got at Joanne Fabrics. I marked every inch, selvage to selvage and then tore the strips to make a fraide edge. Then I cut the strips into 6 inch pieces. I tied them to a metal wreath that I bought at Joanne's. (They have smaller ones, in case you don't want to spend hours tying the ties.
This is the fabric I used

This is what it looks like with all the ties tied.
Then I had my daughter Andrea, design in the Bernina software a shamrock. We sewed it in the hoop. We used green Heather Bailey felt.  And then slit a hole in the back and stuffed it lightly. Then I hand sewed it shut. (You could make the shamrock by hand, but we like using our 830 Bernina!)
Then I cut 2 inch strips with the pinking shears to make the bow. I sewed it together like I would strips for border/binding a quilt.
I cut a 1 x 8 inch strip with the pinking shears and then I sewed it to the shamrock.  I tied this to the bottom of the wired wreath.

Then I took the long ribbon and wrapped it through the wired wreath and tied it to make a bow.
Here again, is the finish product!